Nuffnang

Showing posts with label Bake-Along. Show all posts

Sunday, March 27, 2016

Roast chicken with autumn fruits and quinoa

If you have seen my last recipe on 3 step roast chicken, you may be keen on this one. It is same same but somewhat different.
 
I really do like this version from Diana Henry. It is very much comfort food and best of all, super easy that you need not fuss too much about it. Perfect for a lazy day or when you want to have homecooked food but yet, not do too much. See my modifications/comments in blue.
 
Ingredients:
 
1 teaspoon dry mixed herbs I used Nomu's Moroccan Rub
2 tablespoons butter, softened You may also use olive oil
1 whole chicken, washed and cleaned (even the cavity)
Salt and pepper to taste
2 small apples, cored and cut into wedges I used 1 Fuji apple
2 plums, stoned and cut into wedges I used 3 small plums
1 medium yellow onion, cut into wedges
1 tablespoon olive oil
 
1 cup quinoa This may be too much for 2 pax so probably 3 pax as quinoa does 'expand' after cooking
1 tablespoon olive oil
1 tablespoon butter, softened
2 garlic cloves, crushed
2 cups hot water (I used 1 cup water and 1 cup chicken stock and boil them)
 
Method:
  1. Preheat oven to 180°C.
  2. Mix dry herbs Moroccan Rub and butter together. Carefully lift the skin off the chicken thighs and stuff with some of the herb-ed butter. Season the outside with salt and pepper to taste. Lower the temperature to 170°C. Put the chicken in a roasting pan and roast for 30 minutes.
  3. Toss all the fruits and onions together in a bowl with salt, pepper, and olive oil. Remove the chicken from the oven and put the fruit and onions around the chicken. Stir the fruit around to coat in the cooking juices. Dot with remaining butter and return to the oven for a further 30 minutes, turning the fruit once during this cooking time. Turn the chicken to the other side to brown it as well.
  4. Start making the quinoa 20 minutes before the chicken is ready. Put it in a sieve, wash well and drain. Heat up oil in a sauce pan; add butter and garlic. Gently saute until soft. Add the quinoa and stir until well coated in oil. Add water and chicken stock seasoning and cook for 20 minutes, until the grains are soft. Cover for 5 minutes, then fluff up with a fork. Don't fret if you see your pot totally reduced of any liquid. It should be this way.
  5. Serve the chicken on a warm platter surrounded by fruits and quinoa.
 
 
Truth be told, Mr G wasn't too fond of the stone fruits but he did like the fact they made the chicken taste abit sweeter but yet still retains its savoury flavour. But what surprised me was he literally finished the whole plate of quinoa and I had only a 1/4 of the whole portion. So you can imagine how flavourful and yummy the quinoa tastes. Do try this if you don't want to cook a lot.
I'm submitting this post to I Heart Cooking Clubs - March Potluck.
I'm also submitting this to Bake Along organized by Zoe of Bake for Happy Kids, Lena from Frozen wings and Joyce of kitchenflavours.


I'm also submitting this to Cooking with Herbs - March - Easter and Spring organized by Karen of Lavender and Lovage.

Cooking with Herbs Lavender and Lovage


Friday, March 25, 2016

3 step Roast Chicken

Truth be told, I have many ideas on what to cook for dinner.  But since I'm busy mugging for exams, Mr G said ok let's do something really simple but yummy. He said why not make that simple roast chicken you made for me very very long time ago. Sometimes, I think men's memory are just a lot wider in capacity than women's. Haha!! But they do feign ignorance if you are asking them to recall something they don't want to :P Ok so much for hard truth!

In any case, I do recall baking a roast chicken with just butter, salt and pepper or something like that and it turned out pretty good. So I went to search for a simple roast chicken recipe.

To be honest, I call this a 3 step recipe. It is super easy peasy you will cry when you eat the roast chicken. See my modifications or comments in blue.

Ingredients:

1 kampung chicken or spring chicken (depending on which part of the world you come from)
olive oil or softened butter (I would definitely suggest butter)
1 tbsp salt (go easy on the salt if you are using butter)
pepper
lemon (optional) I used 1 lemon, cut into small pieces
fresh herbs (optional) I used Nomu African Rub but you can use italian herbs too
garlic cloves (optional) I used a good handful

Method:

  1. Preheat your oven to 220 or 200 degrees celsius. This depends on your oven's temperature for roasting chicken. Please adjust accordingly.
  2. Wash the chicken thoroughly to get rid of any innards in the cavity. You may also want to examine the chicken for any feathers that have not been plucked out. Haha!! This is where the OCDness comes in :P Pat your chicken dry. I mean really dry, even in the nooks and crannies are and don't forget the cavity too!
  3. Rub the olive oil or butter all over the chicken, paying special attention to the chicken wings and drumsticks. The oil/butter helps the chicken skin to be crisp and golden.
  4. Sprinkle salt and pepper all over the chicken. I also add the Nomu rub to this step. You can be very generous here.
  5. If you like, you can add the lemon, herbs and garlic cloves inside the cavity of the chicken. You may want to use a toothpick or satay stick to secure the cavity so nothing comes out whilst you are turning the chicken. As usual, the lazy me never did that and some of it came out while I was turning the chicken. Whatever :P
  6. Place the chicken, breast-side up in a pan or lift it off the pan with a roasting rack and roughly chopped vegetables.
  7. Put the chicken in the oven and lower the oven temperature to 200 or 180 degrees. Roast the chicken for about 50 minutes undisturbed. This literally means don't flip or touch the chicken at all. Try!! 
  8. At the 50th minute, you may turn the chicken over to give it an even brown colour throughout. Continue to bake for another 30 minutes.
Notes:

The chicken will take about total roasting time of 50 minutes to 1.5 hours, depending on the size of your chicken. However, as I don't have a meat thermometer, I usually use my eyes to gauge. When the chicken is golden brown all over, it indicates that it should be fully cooked inside as well. It took me a total of 60 to 80 minutes to bake the chicken.


This is exactly how golden brown it looks. Warning! When you cut open the chicken immediately, there may be hot steam. This is a perfect indicator that you need to eat it NOW.


We paired the chicken with homemade coleslaw. If you must ask how to make the homemade coleslaw, it is pretty simple. Shred some cabbage, carrots and dice onions. Add mayo, salt, pepper and abit of milk and chill it till you are ready to eat your roast chicken.

I remembered eating a drumstick and a wing and the next I looked, the chicken was almost all gone!! Mr G literally ate the rest of it. I was very shocked. But this also means the chicken is very very good. So now you must get going to try this. You won't regret it for sure. No roasted chicken in the supermarkets can compare to this at all.

I'm submitting this to Bake Along organized by Zoe of Bake for Happy Kids, Lena from Frozen wings and Joyce of kitchenflavours.


I'm also submitting this to Cooking with Herbs - March - Easter and Spring organized by Karen of Lavender and Lovage.

Cooking with Herbs Lavender and Lovage


Wednesday, May 20, 2015

Madeira Cake

I've bookmarked this recipe ages ago. Now I'm given the chance to finally make it for real ;)
 
According to Nigella, she believes that her mother-in-law's version of this madeira cake is probably the best version she's tried. If Nigella says this, I definitely believe her. Based on my experiences, I have never failed with any of Nigella's recipes so that says alot for me. I also love this madeira cake as it is a very nostalgic butter cake for me.
 
Did you know that madeira cake is a traditional English sponge cake? It has a firm but yet light texture and is eaten for tea or traditionally breakfast. I second that!! This cake is perfect for tea for sure :) Now you don't have to eat this for tea. I don't believe you can wait that long :P
 
This recipe is from Nigella's How to be a Domestic Goddess.
 
Ingredients:
 
240 grams unsalted butter (softened)
200 grams caster sugar (plus extra for sprinkling) 
grated zest and juice of 1 unwaxed lemon
3 large eggs
210 grams self-raising flour
90 grams plain flour
 
Method:
  1. Preheat the oven to 170 degrees celsius.
  2. Butter a loaf tin.
  3. Cream the butter and sugar till pale yellow and add the lemon zest.
  4. Add the eggs one at a time with a tbsp of mixed flour each time you add an egg.
  5. Then gently mix or fold in the mixed flour and finally the lemon juice.
  6. Pour the batter into your buttered loaf tin.
  7. Sprinkle about 1-2 tbsp caster sugar over your batter.
  8. Bake it for 1 hour or until the cake tester comes out clean.
  9. Remove to wire rack, cool and then turn the madeira cake out.
  10. Then try to keep it from itchy hands HAHA!!
It was hard to keep this cake away from  Mr G. The fragrance of the madeira cake simply eluded every part of my house and it smelt great. Mr G just kept looking at me while I sliced the cake, waiting to pick up some crumb that I dropped along the way. Haha!! Enough said about the deliciousness of this tea cake. Try it now!!


I'm submitting this post to Bake Along #79 organized by Zoe of Bake for Happy Kids, Joyce of kitchenflavours and Lena of herfrozenwings.
 
 
I'm also submitting this post to Cook-Your-Books#23 organized by Joyce of kitchenflavours.

 photo 77951578-1914-4b72-8eda-9e40a91183ac_zps331eb4b4.jpg

Link up your recipe of the week


Thursday, July 10, 2014

Orange Chiffon Cake

It's been a while since I last joined Bake Along. This time, the selected theme is Chiffon Cakes. It's one of my favourite cakes that I like to savour.

So I relied on my much-trusted book from Kevin Chai. It's his book, Chiffon Cake is Done. I like his recipes - simple to bake and yet, not too sweet.

Ingredients:
 
(A)
7 egg yolks
50g caster sugar
60ml orange juice (this will be the juice of 1 orange)
1/2 tsp salt
1 tsp orange flavouring I omitted this
4 tbsp canola oil
rind of 1 orange
110 plain flour

(B)
7 egg whites
130g caster sugar
1/2 tsp cream of tartar
 
Method:
  1. Gently whisk the egg yolks, sugar, salt, orange zest, orange juice in a mixing bowl until just combined. Fold in flour until there is a thick batter.
  2. Whisk egg white and cream of tartar until foamy. Whisk egg whites till slightly frothy, then add cream of tartar. Add in sugar, 1 tbsp at a time and continue to beat at high speed until stiff peaks form.
  3. Add a dollop of the egg white mixture to the egg yolk mixture and gently fold in until combined. Use swift strokes. Add the remaining egg white mixture to the combined mixture. Gently fold beaten egg white mixture into egg yolk mixture until well mixed. Pour into a 22 cm chiffon cake mould and bake in a preheated oven at 170C 160 degrees celsius for 30 -40 minutes or until cooked.
  4. Remove from oven and invert cake pan to cool.

See how soft and boing boing the chiffon is!!


The fragrance that oozes from this chiffon cake is so citrusy and fresh. It just entices me to want to eat more. I need to be stopped!
 
I'm going to submit this to Bake Along #64 organized by Zoe of Bake for Happy Kids, Joyce of Baking Flavours and Lena of Frozen Wings.
 
 
I'm also submitting this to Cook-Your-Books#14 organized by Joyce of Baking Flavours.
 
 photo 77951578-1914-4b72-8eda-9e40a91183ac_zps331eb4b4.jpg

Sunday, May 4, 2014

Vegan Low-Fat Chocolate Cupcakes


It's time to celebrate! Celebrate what, you ask? Celebrate Bake-Along's 3rd Anniversary with Lena, Joyce and Zoe!!
 

If you are curious what is Bake-Along, it is a twice a month event whereby the founders of Bake-Along bake together with more friends :) It's been a while since I last participated.
 
This time I'm back to celebrate their 3rd!! But with a humble cake :) Yes, a humble cake with no frills, no rainbow, no fireworks. Just a good old cake you can depend on ;)
 
I found this recipe from thespicedlife and then I realised I have the same book too!! This recipe is from Joanne Chang's Flour: Spectacular Recipes from Boston's Flour Bakery + Cafe.

Makes one 6 inch cake 6 cupcakes

187.5g unbleached all-purpose flour
112.5g granulated sugar
33g Dutch-processed cocoa powder
1 tablespoon instant coffee powder
1 teaspoon baking soda
¼ teaspoon kosher salt
1 cup water
54g canola oil
1 teaspoon vanilla extract
2 tablespoons unsulfured light or dark molasses brown sugar
Confectioners’ sugar for dusting

Method:
  1. Preheat oven to 350 degree F 160 degrees celsius and position the oven rack in the center of the oven. Oil and flour the 6 inch cake pan. Remove the excess flour from the pan.
  2. In a medium bowl, stir the flour, sugar, cocoa powder, espresso powder, baking soda, and the salt. In another bowl, whisk together the water, oil, vanilla and molasses brown sugar.  Pour the liquid into the dry ingredients and mix with a wooden spoon until the batter is smooth. Pour into prepared cake pan. cupcake cases.
  3. Bake for 50-55 20 minutes or until the cake springs back when lightly pressed in the center insides of the cupcakes are almost dry on the testerLet cool in the pan for an hour on a wire rack, then remove the cake, and continue to cool on the wire rack , cake right side up until cooled completely if you can wait that long.
  4. Just before serving dust with confectioners’ sugar.  Cake can be stored in an airtight container at room temperature for two days. That is if it can be kept out of reach for 2 days. I'm sure it'll be gone in no time.
The cupcake is very moist in its interior. I think Joanne is a brilliant one! The idea of mixing the wet into the dry ingredients like how Rose does hers is absolutely intelligent. Best of all, this cupcake recipe is super easy peasy that you can even do it with your kids :) I left my cupcakes undressed because that is just the way I like it, without frosting and all.
 
 
I'm submitting this post to Bake-Along organized by Lena, Joyce and Zoe.
 
Photobucket
    Link up your recipe of the week

Sunday, March 23, 2014

Sour Cream Marble Cake

Have you ever tried using sour cream in your cakes? Lately I have been using recipes that seem to either have buttermilk, yoghurt and even sour cream. And those that use sour cream seem to have this added moistness to the cake. It makes the cake light but yet, not overpoweringly rich that you can only eat a slice. Well, maybe you can now eat two slices or even three slices. Best of all, together with butter, sour cream seems to make the butter cake taste so much better.

For a while now, I haven't been participating in Bake Along. This event is organized by  organized by Zoe of Bake for Happy KidsJoyce of bakingflavours and Lena of Frozen Wings. This time round, I saw marbled butter cake as the theme. Aha!! I was supposed to bake marble cake for the little sister but didn't manage to and it was quite a while that she requested for it. Now is the chance to do it ;P

I saw this recipe modified by Sihan where the recipe originated from Carole Walter's Great Coffee Cakes

Makes 1 9-inch bundt cake, about 10 to 12 servings


Marbling


90g fine quality bittersweet chocolate, coarsely chopped

18.9g unsalted butter
3 tbsp cocoa powder
2 tbsp light corn syrup
3 tbsp water
1/4 tsp baking soda

Batter


250g sifted cake flour, spooned in and leveled

1 1/2 tsp baking powder
1/2 tsp salt
281.25g sour cream
60ml milk
1 1/2 tsp pure vanilla extract
170g unsalted butter, slightly firm
337g caster sugar
4 large eggs
powdered sugar, for dusting

Method:

1. Position the rack in the lower third of the oven. Heat the oven to 350°F. Generously butter a 9 - inch Bundt pan, dust with flour, then invert the pan over the kitchen sink and tap firmly to remove the excess flour. Set aside.

Make the Marbling

2. Melt the chocolate and butter in a 2 - quart bowl set over a pot of simmering water. (The bottom of the bowl should not touch the water.) Stir in the cocoa powder, corn syrup, and water, mixing until smooth. Remove from the heat and blend in the baking soda. Keep the chocolate mixture warm over the water bath while you prepare the batter.

Make the Batter

3. In a large bowl, thoroughly whisk together the flour, baking powder, baking soda, and salt and set aside.

4. In a medium bowl, combine the sour cream, milk, and vanilla. Set aside.

5. Cut the butter into 1 - inch pieces and place in the bowl of an electric mixer fitted with the paddle attachment. Mix on medium speed for 2 minutes, then add the superfine sugar, 1 to 2 tablespoons at a time, taking 6 to 8 minutes. Scrape down the side of the bowl as needed. Add the eggs, one at a time, at 30 - second intervals, scraping down the side of the bowl ­again.

6. Reduce the mixer speed to low. Add the dry ingredients alternately with the sour cream mixture, dividing the flour into three parts and the sour cream into two parts. Mix just until blended after each addition. Scrape down the side of the bowl as needed.

7. Remove the marbling mixture from the water bath. Measure 11⁄2 cups of the batter, and add it to the marbling mixture, folding the two mixtures together gently.

8. Spoon one - half of the vanilla batter into the prepared pan and smooth the top with the back of a large soupspoon. Using about one - third of the chocolate batter, distribute spoonfuls evenly over the vanilla batter, smoothing it carefully to the edge and covering as much vanilla batter as possible. Spoon one - half of the remaining vanilla batter over the chocolate batter. Spread the remaining chocolate batter over the vanilla, then finish with the remaining vanilla batter. As each layer of vanilla batter is spread, cover as much of the chocolate as you can.

9. Insert a table knife almost to the bottom of the pan and gently lift the knife up, over, and down again to fold the batters together, making about 15 folds as you rotate the pan. Smooth the top of the batter with the back of a large soupspoon.

10. Bake for 55 to 60 minutes. The cake is done when the top is golden brown and firm to the touch, and a wooden skewer inserted in the center comes out clean.

11. Remove the cake from the oven and let stand on a cooling rack for 15 to 20 minutes. Cover with a cooling rack, invert the cake, and carefully lift off the pan. Cool the cake completely on the rack. Just before serving, dust the top with powdered sugar.

Check out the marbled batter before it was baked. 


It kinda resembles feather like strokes to me. Now, I'm excited how the final marbling would turn out to be.


This looks HUGE isn't it? Yes it definitely is huge. And I realised a huge part of the marble cake turns out to be fairly pale. Hmm, I wonder why.


Although there seems to be similar patterns in the marble, I quite like the marbling design in the cake itself. Interesting! Same same but yet somewhat different :) I've tasted the marble cake. It reminds me of my childhood where we would eat this in school tuckshop and it would taste all buttery but yet nice. Yes nostalgia is usually what brings you when you are getting older. Haiz, older but hopefully wiser of course ;) What about you? Does marble cake bring sighs to you? Sighs to make you think of your childhood too?

And can I even talk about this recipe? I feel the addition of sour cream just brings the marble cake to another level. I love dense butter cakes but yet I love the softness and tight crumbs of this marble cake by Carole Walter. This is yet another winning recipe for me. I love it!!


I'm also submitting this to Cook-Your-Books#10 organized by Joyce of bakingflavours.


Wednesday, January 22, 2014

Pistachio cookies

I'm late, late, late!!! Chinese New Year is only a week away. So many things I have yet to do, need to do but still haven't got to do. This time round, I feel that time is ticking furiously unlike last year where we had a month of rest from the festive Christmas mood. I have so many to-bake items on my list but I haven't really gotten to do them. One or two I tried to test bake but failed. I might or might not have time to try them again.

I found this interesting but yet delectable cookie recipe from The Little Teochew who got it from Trissalicious. Mind you, if you were to mention this cookie, remember to say that it's the Trissalicious pistachio cookie ;) Remember you've got to give something its due when you've got to give. See my modifications or notes in blue.

Ingredients:
  • 90g and 100g Pistachios (raw, shelled) 
  • 100g almond meal (which is also finely ground almonds)
  • 120g caster sugar
  • 50g egg whites (from around 1 to 2 eggs)
  • Green food colouring (optional)
Method:

  1. Lightly toast the pistachios for around 10 minutes or less in a preheated oven at 160 degrees celsius. Once it browns, you can take out the toasted pistachios. Chop Grind the first 90 grams of pistachio finely (you can use a food processor for this) and the other 100 grams of pistachios roughly. 
  2. In a bowl place the finely chopped 90g of pistachios, almond meal, sugar and egg whites. Mix well (you can add a few drops of food colouring now if you wish) until you form a paste.
  3. Scoop the cookie batter and form into little balls, (at this point, if you find the batter too sticky add a little bit more almond meal to the paste) then roll them in the remaining 100 grams of pistachios.
  4. Place them on baking sheet, around 2 cm apart and bake for around 13 minutes at 170°C (fan forced).
  5. Dust with icing sugar when cool.


Do they look festive enough? As I didn't put any green colouring, the pistachio cookies look a tad brown. But I guess natural should be better than any form of artificial colouring which is not something that I like. I tried one and did like the taste of it with the nutty aroma from the pistachios. Beware that this can be quite addictive too!

I'm submitting to this to Bake Along #57 organized by Zoe of Bake for Happy Kids, Joyce of kitchenflavours and Lena of Frozen Wings.


Monday, November 4, 2013

Cocoa Tuiles

It's been a long long while since I last joined the Bake Along. I have meant to join in the past few Bake Along(s) but didn't manage to join in time. Never mind, today is an exception :)

When I saw the topic 'Tuiles', it got me intrigued. I remember seeing tuiles in this Parisian cafe before. That was really long ago. Come to think of it, I feel pretty bummed about not even trying those tuiles. As you can see where this is coming already, it is definitely my first time baking tuiles.

Tuiles are pronounced as 'tweel'. Note that the 's' is silent. Yes, indeed it is very French ;P According to Alice Medrich, these tuiles is a quintessential cookie experience in a world of its own - ultrathin, elegant, addictive, very flavourful and infinitely flexible once you get the hang of them. You can even roll them into little cigarettes or shaped as tiny ice cream cones for a fancy party.

An important point to note is timing of the bake. Remember these cookies are ultrathin so you need to be very careful with the timing that you bake them so they don't burn.

This recipe is from Alice Medrich's Chewy Gooey Crispy Crunchy Melt-in-your-mouth cookies.

Ingredients:

56g butter, melted and still very warm
112g caster sugar
29g cocoa powder, sieved after measuring
1/8 tsp salt
2 large egg whites
10g plain flour

Method:

  1. Preheat oven to 170 degrees celsius. 
  2. Cover baking sheet with aluminium foil and smoothen it to remove any wrinkles.
  3. Grease the aluminium foil with baking spray and use a brush to ensure that the baking spray is spread evenly throughout the baking sheet.
  4. In a small bowl, whisk together the melted butter, sugar, cocoa and salt.
  5. Whisk in the egg whites.
  6. Add the flour and whisk fold in only until combined.
  7. Let rest for at least 10 minutes or cover and refrigerate for up to 3 days. I refrigerated the batter for about a day.
  8. Allow batter to return to room temperature.
  9. Drop level teaspoons of the batter about 3 inches apart onto cookie sheets.
  10. Using a small offset spatula or the back of a spoon and in a circular motion, spread the batter evenly into 3-inch rounds or ovals or other shapes to about 1/16 inch thick.
  11. Bake (watch it carefully) for about 1o to 12 minutes (I used 9 minutes only) until the edges are slightly darker than the rest of the cookie.
  12. Shape and roll your cookies while hot from oven and be gentle with them. To retain the crispness, put the cookies in an airtight container once they are cool. They can keep for at least 1 month. Trust me, it won't be a week before they are gone ;)


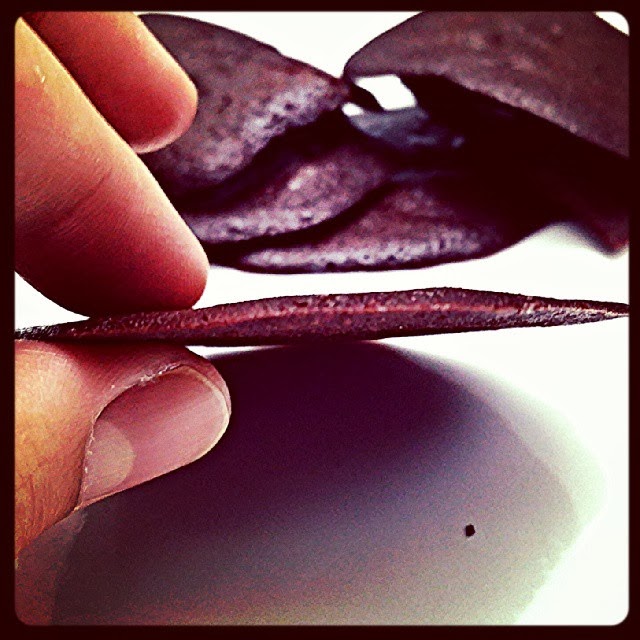
After much 'coercing', I managed to grasp the technique of trying the curve the cookie like potato chips. The trick here is to do it fast. With an injured finger already, trying to curl the hot cookie can be pretty daunting. But nevertheless, I still managed to roll the cookies over a rolling pin but only a few managed to be curved. The rest just broke with a loud crisp CRACK!! Erm, epic fail right? Haha Those that broke ended up in my mouth anyway ;P

To be honest, the tuiles tasted so good that they were truly very addictive! One is just not enough and before you know it, you'll probably had more than 3 in your tummy. Alice Medrich, your cocoa tuiles is definitely genius!!


Can you literally see how ultrathin these beauties are? I love them and the crackling sounds they make when you bite into them.

I'm submitting this post to Bake Along #54 organized by Joyce, Lena and Zoe.


I'm also submitting this post to We Should Cocoa #39 hosted by Rebecca of BakeNQuilt.com for this month and organized by Choclette of Chocolate Log Book.


I'm also submitting this post to The Biscuit Barrel by I'd Much Rather Bake Than...


Saturday, May 4, 2013

Celebration Cupcakes for Bake-Along #44

Since this week is Narayan's birthday and we decided to celebrate his birthday today, I thought I should bake something he likes (obviously, duh!) and something that we all will love to eat. He likes many stuff like tofu, black sesame, etc. I stumbled upon this recipe from The Little Epicurean who adapted it from Delicious Coma. I was thinking, black sesame and matcha - interesting combination that I've never tasted before. However, after much googling, many people gave this combi thumbs up so I figured it would be a worthwhile bake.

Recently, I have been reading up on some baking science written by Rose who wrote about the 'reverse creaming' method for cake baking. Rose Levy Beranbaum literally shook the baking world in 1988 with her baby 'The Cake Bible' where new techniques for mixing and baking cakes were revealed by her as a result of her scientific research. If you are one who bakes, you would probably be very familiar with the idea of the 'creaming' method who means to cream your butter and sugar at the first step before you proceed with the rest. 

However, Rose came up with the method of mixing ingredients in a different order for better results - namely, to mix all the dry ingredients together first and then add the butter (fat) to the dry ingredients where the fat coats all the flour/dry ingredients. Thereafter, a minimum amount of liquid is added to the mixture, which coats the flour before adding the remaining liquid ingredients. 

To many bakers, they call this the 'reverse creaming' method. According to Rose, this method she chose is faster, easier and prevents overbeating of the batter that makes your cakes/cupcakes texture tougher. 

Incidentally, while I was doing my research, I came across Zoe's post on this and was convinced to try it. This is the challenge I'm posing to myself for this bake :) I love challenges, don't you?

I know I have written before that I wouldn't post recipes here due to copyright issues. However, I'm going to do so as I have taken the recipe from The Little Epicurean but used the 'reverse creaming' method. 


Black Sesame Cupcakes with Matcha Cream Cheese Frosting
makes 12 cupcakes

Ingredients:

113g unsalted butter, room temperature
170g sugar
30g black sesame seed powder/flour
1 extra large egg, room temperature
1 tsp. vanilla paste
1/4 tsp. salt
155g all purpose flour
162g milk


Method:
  1. Preheat oven to 160 degree celsius. 
  2. Put flour, black sesame powder, sugar, salt and butter with a paddle attachment and beat slowly until you get a sandy consistency and everything is combined.
  3. Gradually pour in 1/2 of the milk and beat until milk is just incorporated.
  4. Whisk the egg, vanilla extract and remaining milk in a separate bowl for a few seconds, then pour into flour mixture and continue beating until just incorporated. Remember to scrape the sides of the bowl so to ensure full incorporation of all ingredients.
  5. If you see bits of flour, don't use your mixer anymore to prevent overmixing. Just use your spatula to fold in remaining bits of flour.
  6. Spoon batter into cupcake cases till 2/3 full and bake for about 20-22 minutes. Let cool.
  7. Begin preparing frosting. Once cupcakes are cool, use an apple corer/melon baller/fat end of piping tip to create a shallow cavity on top of cupcake.
Could you spot the tiny black speckles from the black sesame powder? :)

Matcha Cream Cheese Frosting:

113g unsalted butter, room temp
170g confectioner’s sugar, or more if you want stiffer frosting
226g cream cheese, cut into small pieces
1 Tbsp. matcha green tea powder, or more to taste


Method:
  1. Cream butter with paddle. 
  2. Add confectioner’s sugar and beat until combined. 
  3. Slowly add cream cheese. Mix until combined. 
  4. Add matcha powder and beat until fully incorporated.

For the frosting, use your cupcake corer to remove the middle portion of the cupcake.


prepare a piping bag with a medium star tip. 
Place frosting in prepared bag and fill the cavity until it reaches the top of the cupcake. 
Pipe a large rosette to cover the hole. 


Sprinkle the top with black sesame seeds.


Store cupcakes in the refrigerator and bring to room temperature before serving.

My verdict: The cupcakes turn out moist in texture, in fact, very soft and moist. Together with the matcha cream cheese frosting, I must say that this interesting combination of cupcake and frosting is definitely a keeper! Do not shun this recipe because of its trio combination - black sesame, matcha and cream cheese. It is a winner for me! And I must say, Rose's 'reverse creaming' method did it for me! I'm going to try this method whenever I bake.